The problem
I wanted to replace a plain ceiling lamp with a smart ceiling fan that has an integrated light, fully controllable from Home Assistant. The fan I picked has a Tuya WiFi canopy, and that canopy holds the speed controller, the LED driver, and the WiFi chip that talks to Home Assistant. That chip needs constant 230 V to stay on the network. If it loses power, the canopy takes 20 to 30 seconds to boot and reconnect.
That single fact kills every obvious wiring option. Put a smart relay in line with the wall switch and the canopy drops off WiFi every time the switch is off. Work around it in Home Assistant by powering the canopy on first and waiting for it to reconnect, and you add 20 seconds of latency to every voice command, every app tap, every automation. Tape the switches permanently on, and the switches on the wall become a lie. Hardwire the fan past the switches, and the switches do nothing at all.
The house has a Spanish two-way (conmutador) circuit: two wall switches at opposite ends of the room sharing one lamp. Whatever I built had to leave those two switches looking and feeling exactly as before, because anyone in the house should be able to flip them without knowing anything changed.
How I built it
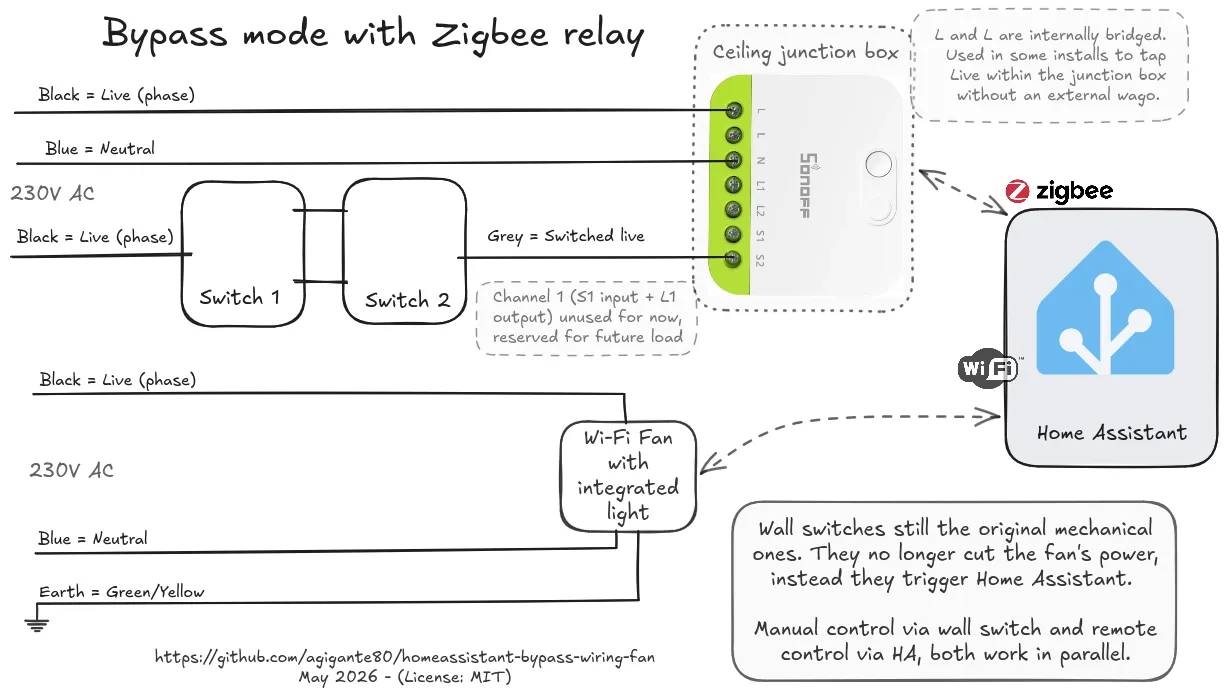
The fix is bypass wiring. The fan canopy is wired straight to permanent live and neutral, completely around the relay’s load output. The canopy is always powered, always on WiFi, always reachable. Home Assistant automations fire instantly with no boot-and-wait penalty.
The Zigbee relay (a SONOFF MINI-ZB2GS in this build) stops being a load controller and becomes a sensor. The switched-live coming back from the conmutador chain lands on the relay’s S input instead of driving any load. The relay runs in edge-trigger mode, so every wall-switch flip produces a Zigbee event that toggles the relay’s reported state in Home Assistant. The L1 and L2 load outputs are left capped and unused.
A small Home Assistant automation listens to that switch entity and decides what each flip means. The logic I settled on is the smallest behaviour that feels like a real wall switch: if the fan or its light is on, flipping turns both off; if everything is off, flipping turns the light on. You never need two flips to get the room dark, and the switch always does something visible.
I deliberately kept the policy in YAML rather than relying on a relay firmware feature like detached mode. Firmware features are brand-specific and version-specific. Bypass wiring is just a wiring choice, so it works on any 2-channel Zigbee relay with edge-trigger support, and changing what a flip does is a config edit instead of a rewire.
Architecture
The hardware and software boundary is clean. The relay does one job, report a state change. The canopy stays available because it is always powered. Home Assistant owns the policy, deciding what a flip means. Three control surfaces (voice assistants, the Home Assistant app, and the physical wall switches) all drive the same fan and stay in sync through Home Assistant.
The repository documents one concrete install but is built to be adapted. The automation is parameterised by three entity IDs, so swapping in a different fan or relay is mostly a config change. The wiring diagrams export from a single Excalidraw source file, so redrawing them for a different room, brand, or country is a quick edit rather than a fresh drawing. The repo also bundles the vendor PDF manuals for offline reference and a terminology table that untangles bypass wiring from the firmware features it gets confused with online.